Posts Tagged ‘Drinks’
Warning: Use of undefined constant archives - assumed 'archives' (this will throw an Error in a future version of PHP) in
/home/nashvegg/public_html/blog/wp-content/themes/cordobo-green-park-2/archive.php on line
32
Warning: Use of undefined constant page - assumed 'page' (this will throw an Error in a future version of PHP) in
/home/nashvegg/public_html/blog/wp-content/themes/cordobo-green-park-2/archive.php on line
32
Warning: A non-numeric value encountered in
/home/nashvegg/public_html/blog/wp-content/themes/cordobo-green-park-2/archive.php on line
32
Warning: A non-numeric value encountered in
/home/nashvegg/public_html/blog/wp-content/themes/cordobo-green-park-2/archive.php on line
32
class="post-1721 post type-post status-publish format-standard hentry category-coffee category-drinks tag-coffee tag-cold-brew tag-drinks tag-iced-coffee tag-summer">
May 15th, 2015
I drink coffee. Lots of coffee. 4 cups in the morning and another 2-3 cups in the afternoon. Sometimes more. I keep it convenient and with cold brew coffee it’s almost too convenient. With the summer quickly approaching I’ll be swigging the cold brew coffee almost constantly. Over the past 3 years I have made cold brew coffee a part of my warm season life. I’ve also perfected the brew.
For those who do not know, cold brew coffee is nothing more than a coffee concentrate brewed slowly at room temperature. The long extraction at a lower temperature will bring out the flavors of the coffee without the bitterness that hot brewing typically does. Best of all, you can make your own cold brew coffee a home with minimal equipment.
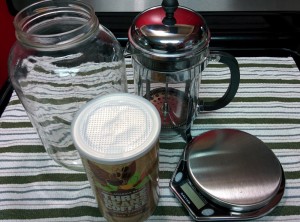
Making cold brew coffee requires very little in the way of equipment and you likely already have everything you need around your kitchen. A gallon jar, a scale for measuring your coffee and a french press for straining the brew. If you don’t have a coffee grinder you can grind your beans when you buy although freshly ground beans are always best.
You’ll need:
- A one gallon jar or other brewing vessel of the same capacity
- A pitcher or sealable container for storing your cold brew coffee. You’ll end up with about 2 1/2 liters of coffee from this process.
- 14 ounces (about 400 grams) of coffee. Whole beans best if you have a grinder. You’ll want your coffee to be coarsely ground. Set your grinder for french press or the coarsest grind it will provide Also, medium to dark roasts lend a better flavor for cold brewing.
- a small scale for weighing your coffee.
Once you have your coffee ground and measured the rest of the initial work is nothing more than putting the coffee into your brewing jar and filling it the top with about 3 liters of cold water. It’s going to seem like you’re adding a very large amount of coffee to a not so great amount of water and that is exactly what you’re doing. Once the jar is filled to the top give it all a good stir so the coffee grounds are soaked well. If your jar has a lid screw it on or other wise cover it with a piece of plastic wrap and put it aside. The entire brewing process will take 24 hours. After 6 hours stir the mixture again so the grounds will settle to the bottom. Stir the mixture once again about 12 hours into the brew.
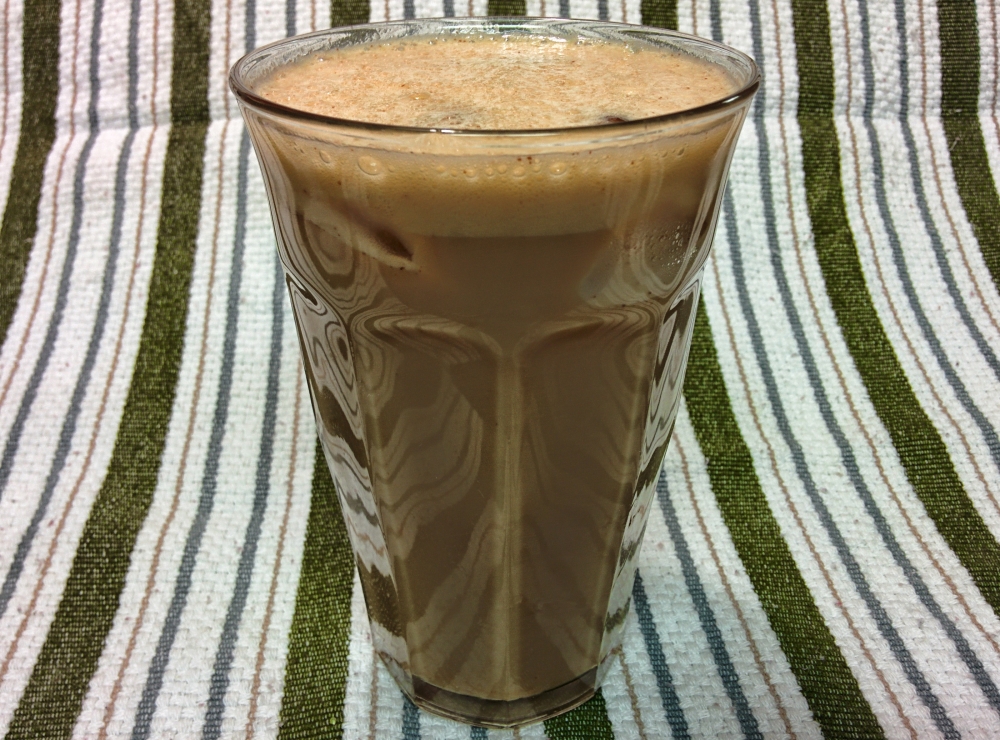
After 24 hours you are ready to strain the concentrate. I use a french press and find this the easiest way to do so. If you don’t have a french press you can use a screen mesh colander but you will get more grounds in your concentrate. Cheesecloth can also be used but the straining will be a much slower process. After straining the concentrate pour it into a sealable pitcher or container and place in your refrigerator. You can keep it refrigerated up to 2 weeks but a batch seldom lasts more than 4-5 days at my house. You can serve it however you desire but a general rule is 1 part concentrate to 2 parts milk or water. I prefer soymilk, a little brown sugar, vanilla and ice. You can also use the same ratio of concentrate to hot water for a quick cup of the smoothest tasting hot coffee you can make.

A perfect coffee drink for hot weather. Cold brew coffee, soymilk, a little brown sugar and vanilla over ice.
: Use of undefined constant archives - assumed 'archives' (this will throw an Error in a future version of PHP) in
: Use of undefined constant page - assumed 'page' (this will throw an Error in a future version of PHP) in
class="post-1512 post type-post status-publish format-standard hentry category-drinks category-homebrewing category-kombucha category-tea tag-diy tag-do-it-yourself tag-drinks tag-homebrew tag-homebrewing-2 tag-kombucha-2 tag-recipes tag-scoby tag-tea">
Kombucha has been the rage for the last couple of years and I never really took much notice. Each time I decided to try a bottle of the fermented tea I recoiled as it was so acidic. I may as well buy a bottle of vinegar to drink. Of course, some people like this and I know it’s an acquired taste so I set out to find a sweeter variety, though, I never found one that I really liked. That’s when I found out I could make it at home and control the flavor. After doing a bit of research I thought easy enough.
The hardest part would be coming across a SCOBY (Symbiotic Colony Of Bacteria and Yeast). If you don’t have a friend who is brewing their own kombucha and can in turn give you a SCOBY then growing your own is the way to go. It will take a bit of time but in the end it will add to the do-it-yourself feel of the project.
Growing Your Own SCOBY
To grow you own SCOBY you’ll need the same equipment to make your own kombucha. This isn’t a big investment and most people have the required items around the house.
1. A gallon glass jar. Do not use plastic as bacteria can take up in the surface and glass is much easier to clean.
2. Teabags. I use black tea. In fact, I used Lipton. You can use just about any teabags you want. This can be the same teabags you will make your end kombucha with later. Don’t use Earl Grey as it contains bergamot oil that will spoil your brew. Also, no herbals. Green or white will work fine, as well.
3. Clean water. This, as you would guess, is the most important step. Do not use chlorinated water straight from the tap. If you must use tap water be certain you filter it with a high quality filter. If at all possible get spring water or go to the store and buy a gallon.
4. One bottle of raw unflavored kombucha. There are many brands to choose from. Just make sure it’s free of fruit or fruit juice.
5. Sugar. I used vegan cane sugar or evaporated cane juice. This is the food that the yeast will feed on. Feed them something good. You could use regular refined white sugar but why would you want to?
6. A paper towel and a rubberband. This will keep the nasty out of your brew. Flies and dust aren’t good for your drink.
Wash the gallon jar very well in very hot soapy water. Sterilization isn’t necessary but you do want to get that jar sparkling clean. Boil 4 cups of water. After the water comes to a boil remove it from the heat and add 5 teabags. I like my tea strong so if you like it a little weaker drop it to 4. Let the tea steep for about 30 minutes and remove the bags. Again, if you want a weaker brew feel free to remove the bags before 30 minutes. Add 1 cup of sugar to the tea and stir to dissolve. Your tea will still be very warm at this point so let it rest for an hour or so until it cools to room temperature. Hot tea will kill your initial yeast and bacteria giving you nothing to grow. After the tea cools pour it into the gallon jar. Fill the jar with the rest of your spring water to about 2/3 the way up. Pour in the bottle of raw kombucha. Cover with the paper towl and secure it over the top with the rubber band.
Put the jar in a place where it can sit undisturbed for about 3 weeks. Depending on the temperature in your home it may take more time it may take less. I’ve been growing this summer and we keep our home at about 76 degrees. In 3 weeks I had a SCOBY ready to go. You may take more time or less. In a week or so you’ll notice a white film on the top of the tea. This is your SCOBY beginning to grow. Keep an eye on it and be sure it’s free of mold. You may notice brown spots but those are normal. Anything hairy or fuzzy is bad. It will go slowly but once it gets about 1/3 to 1/2 inch thick it’s ready. Once you’re at that point you’re ready to brew some kombucha to drink. Remove the SCOBY and set it aside in a large bowl with just enough tea from the jar to cover it. Pour the kombucha out of your jar. You’ll likely not want to drink this as it will be very acidic from the longer brew time. Clean your jar and get ready to brew a batch to drink. Don’t refrigerate your SCOBY. At this point you want to be ready to go with a new batch.

The SCOBY beginning to grow on top of the tea.
Brewing Kombucha
You’ll need the same equipment as above in the growing of a SCOBY except you’ll need a SCOBY and you won’t need an entire bottle of kombucha. The entire process is nearly the same as growing your own SCOBY with a couple minor differences. I’ll list it all for you again:
1. A gallon glass jar. Do not use plastic as bacteria can take up in the surface and glass is much easier to clean.
2. Teabags. I use black tea. In fact, I used Lipton. You can use just about any teabags you want. This can be the same teabags you will make your end kombucha with later. Don’t use Earl Grey as it contains bergamot oil that will spoil your brew. Also, no herbals. Green or white will work fine, as well.
3. Clean water. This, as you would guess, is the most important step. Do not use chlorinated water straight from the tap. If you must use tap water be certain you filter it with a high quality filter. If at all possible get spring water or go to the store and buy a gallon.
4. 1 cup of kombucha. This can be store bought kombucha or kombucha out of your last batch. Don’t use the kombucha from growing your own SCOBY. Chances are it will be very acidic from the time it took to grow the SCOBY. If this is your first batch after growing your own SCOBY use a cup of raw kombucha you purchased at the store. After your first brew, however, you’ll have fresh kombucha to start each batch with.
5. Sugar. I used vegan cane sugar or evaporated cane juice. This is the food that the yeast will feed on. Feed them something good. You could use regular refined white sugar but why would you want to?
6. A paper towel and a rubberband. This will keep the nasty out of your brew. Flies and dust aren’t good for your drink.
7. A SCOBY. This can be one you grew yourself using the instructions above or one you acquired from another kombucha brewer. In the end you’ll have another SCOBY to share or make 2 batches as a new SCOBY grows with each batch you brew. Don’t reuse a SCOBY more than once.
Wash your jar very well in very hot soapy water. As before in the SCOBY growing, sterilization isn’t necessary but get the jar sparkling clean. Boil 4 cups of water. After the water comes to a boil remove it from the heat and add 5 teabags adjusting for stronger or weaker tea. Let the tea steep for about 30 minutes and remove the bags. Again, if you want a weaker brew feel free to remove the bags before 30 minutes. Add 1 cup of sugar to the tea and stir to dissolve. Your tea will still be very warm at this point so let it rest for an hour or so until it cools to room temperature. Hot tea will kill your initial yeast and bacteria giving you nothing to grow. After the tea cools pour it into the gallon jar. Fill the jar with the rest of your spring water to about 2/3 the way up. Pour in the cup of kombucha and place your SCOBY into the jar. The SCOBY may float or it may sink, it doesn’t matter. Cover with the paper towel and secure it over the top with the rubber band.
Place the jar where it can sit undisturbed for about 7 days. After 7 days you will want to taste your kombucha to see if the flavor is at the point you like. You’ll have a SCOBY growing on top of the tea at this point as well as the one you started the brew with. Remove the paper towel and rubberband from the jar. Do not dip a glass or spoon into the brew. The best method for tasting is using a straw remove a small amount to tea from the jar by dipping the straw into the tea and placing you finger over the end of the straw. You’ll want to push the edge of the SCOBY growing on top of the tea just a little to the side to get your straw in. If the SCOBY drops under the tea that’s OK. Release the tea into a glass to taste. DO NOT drink from the straw and put the straw back into your brew. This will introduce all kinds of nasties to the brew and ruin it. You’re growing bacteria in the jar and you want to be certain to not introduce bad bacteria as those will grow just as well. I like my brew with a little bite so I go 10 days on average. The longer you brew the more acidic it will get. Once you get to the flavor desired you’re ready to bottle your brew.

Kombucha in the jar. This was a small batch. A typical brew is about twice this amount.
Bottling Kombucha
If you drink your kombucha straight form the brewing jar you may notice it missing that fizz the store bought kombucha has. To get that fizz you need a secondary fermentation. That’s where bottling comes in. I reused beer bottles and a caped them with a capper. You can also use flip top sealing bottles. I don’t recommend canning jars if you want a good fizz as they won’t seal and aren’t airtight enough in this process.

Bottled kombucha ready for secondary fermentation. The brown bottles have bits of apple and the larger bottle has mango. All of the fruit is freeze dried as I find it flavors much better.
You want to be certain the bottles are as clean as possible. Hot soapy water is the key. Rinse and dry the well and fill each bottle leaving enough room at the top for air to assit in the fermentation. I filled my reused beer bottles about 3 inches from the top. If you want to flavor your brew now is the time to do so. You can use fresh or frozen fruit but I’ve found for the absolute best flavor freeze dried fruit works best. My favorites are apple and mango. Drop just a few small chunks into the bottle before sealing. Also, you can add a teaspoon of sugar to each bottle for a little “food” for fermentation. This is completely optional but you may find you’ll get a better fizz. Seal the bottles and store them undisturbed at room temperature for about 5 days. I know,you want to drink but patience is needed. After 5 days you can put the bottles into the refrigerator to chill and drink when ready.